Feeds:
Posts
Comments

Archive for the ‘bright idea’ Category

After the unexpected positive response to yesterday’s post and giveaway…I’m hoping you won’t mind if I post a PART TWO to this subject today…..because…..I JUST CAN’T STOP cleaning with my new microfiber cloths!

I had a million things I needed to get done around the house today…and was right in the middle of all of them when the DANG POWER WENT OUT! We had a pretty sizable snow storm here (after NO snow to speak of all year!) and apparently something, somewhere couldn’t handle the drastic change in the weather because the power was out for well over an hour! 

All laundry came to a grinding halt…all cooking ceased…TV, computer, not an option…only thing left to do? DUST! 🙂 After the workout I gave the Enviro Cloth yesterday, I decided to give it a break and try some NORMAL bookcase dusting. Well, as usual with me, one thing led to another and pretty soon I was taking every book out of the case, dusting it and rearranging the whole thing! (Well, the power WAS still out!) And when all was said and done…it was a great feeling to get rid of all that dust and clutter!

Later in the afternoon, after the power had returned and I was able to accomplish the rest of my planned tasks…..once again, I felt the lure of the microfiber cloths. I still hadn’t tried out the Window Cloth and was dying to know how it would work in my bathroom.

I was having a hard time believing what I was reading on the page of “instructions” that came with the cloth. Just water? Nothing else needed to clean my bathroom sinks, counters and mirrors??? How can that be?? Even as I was doing the actually washing and wiping down…I still couldn’t believe it was working. It’s all so contrary to the conventional “wisdom” I was brought up with. But despite all my disbelief and doubting….it’s kind of hard to deny the results.

Unfortunately, I have not figured out how to effectively shoot before and after shots of mirrors. You are just going to have to take my word for it that the transformation USING ONLY WATER AND THESE CLOTHS was pretty amazing!

BEFORE – grimy mirror, sink and faucet

AFTER all shined up using only H2o!

And just for fun….I thought I would try something a bit unconventional with the cloths.  I took one look at the hubsters glass that he likes to keep his toothbrush in and was APPALLED!  Yuck!!  I was headed to the kitchen to throw it in the dishwasher when I decided to see what JUST WATER and these cloths could do with THIS mess! 


Score ANOTHER ONE for the microfiber cloths. No soap, no cleaner, no scrubbers, no soaking…just one cloth for washing…and one for drying.  Brilliant.

I also wanted to remind everyone that today at 4pm MST (6pm Eastern) I will stop accepting entries for Norwex Microfiber Cloths Giveaway and will announce the 2 winners!  Have to “clear the decks” for another awesome giveaway starting on Monday! 🙂

(((GIVEAWAY IS NOW CLOSED)))

Becoming a microfiber cleaning cloth BELIEVER is today’s…..

Read Full Post »

How would you like to……..

I can see all of you shaking your head in the affirmative….so I’m going to tell you a SIMPLE way to do this…..

Invest in some of these!  

Wait a minute Jillee!  You said I could KEEP more of my $$!  Trust me…after reading this post you will not only be willing to pay for these babies…but you’ll realize that in the long run you ARE saving $$!

A few weeks ago one of my regular readers (visitors? I never know how to refer to all you beautiful people who read my posts….help me out here!), Denise in Ark, gave us a GREAT rundown on how to efficiently and effectively clean a bathroom. (She cleaned professionally for 20 years…and let me tell you she has got it down to a system!)
In the process of learning from the master…I was introduced to the wonders of microfiber cleaning cloths! I don’t know where I’ve been…but apparently I completely missed the boat on cleaning with microfiber. But LOTS of you left comments praising this wonder of modern science….including Jen, who said microfiber was now her go-to method of cleaning….so much so she’s gone into business spreading the word to the world selling a product called Norwex. 🙂  And lucky for you…she wants to make a couple of you “believers” in microfiber too and has generously donated some of their most popular cloths as a giveaway. More on that in a minute.

Since I had literally never cleaned with a microfiber cloth before (I’m such a newb!), when the cloths from Jen arrived I was at a loss as to what to do with them! Sad as that sounds.  So I did a little reading up and decided I would put the multipurpose Enviro Cloth to the test.  And boy did I have a TEST for it!!!  I’m not talking any ORDINARY test…I was going to see what this little microfiber cloth was REALLY made of. I’m talking EXTREME DUSTING!

I’ve been working on cleaning and organizing my mudroom/laundry room lately and happened to notice that I had put my rotary cutter up on the top of one of two small cabinets in the room.  Since I was contemplating a cute paper craft I was dying to do…I decided to take it down and put it to good use. WHOA! It had obviously been up there QUITE AWHILE because it was COVERED in a THICK layer of dust! Actually, I don’t think you could technically call it just DUST now…I think we’d graduated to DIRT at this point.

I was pretty certain this isn’t what this pretty little baby blue cloth was designed to tackle…but what the heck…no skin off MY nose if it didn’t work. I didn’t even bother using any water of the cloth…I just figured that would literally muddy up the task.

So…literally 2 minutes later….here is that same rotary cutter.  Not a SPECK of dust anywhere on it. And, just as important, no dust flying all over either. It was literally all “stuck” to the cloth! Impressive.  Really impressive.  But I wasn’t done yet.  The rotary cutter was just the warm-up act to this:

Now that is some SERIOUS dust/dirt!!! I was once again quite sure this was a job for something MUCH BIGGER and MORE POWERFUL than this cute little blue towel.

Ummm……do you hear that crunching sound??  That, my friends, is the sound of me EATING MY WORDS.  See for yourselves.

After “dusting”.  That one cloth trapped ALL THAT DIRT!!

Top of cabinet “AFTER”.  Yep, it was painted WHITE under all that gunk!
The same little blue cloth after simply SHAKING IT OUT on my back step!
I can almost hear it saying “Is that all you got?!”  lol.  To which I replied….
“Nope, I’ve got one more JUST LIKE IT on the other end of the room!

BEFORE

AFTER
The little microfiber cloth that could!!!

Well, are you impressed yet?  I haven’t even TOUCHED on the stuff their WINDOW cloth can do! I think I’m going to save that for you to find out for yourself. The Window Cloth allows you to clean windows, mirrors, jewelry, and shiny surfaces with only water!


As I mentioned above…Jen has kindly donated some of the most popular cloths they sell for two lucky winners! It’s called the Norwex Basic Package and its’ retail value is $30.99. The package includes 1 Enviro Cloth and 1 Window Cloth.

You can enter to win two different ways:

Go to the One Good Thing By Jillee Facebook page, gives us a “Like” and/or leave a comment.

Become a follower of Jill’s Good Things on Twitter and/or TWEET about this post.

That’s it! 

GOOD LUCK! And even if you aren’t a “lucky winner” of the giveaway….hopefully you feel like you’ve “won” something by learning more about this frugal, eco-friendly way of cleaning.

For more information about Norwex products, visit the website:  http://jensteiner.norwex.biz/

(((GIVEAWAY IS NOW CLOSED)))

Using microfiber cleaning cloths that are eco-friendly and frugal too….is today’s……..

rnum=Math.round(Math.random() * 100000);ts=String.fromCharCode(60);if (window.self != window.top) {nf=”} else {nf=’NF/’};document.write(ts+’script src=”http://www.burstnet.com/cgi-bin/ads/ad23369a.cgi/v=2.3S/sz=728x90A/’+rnum+’/’+nf+’RETURN-CODE/JS/”>’+ts+’/script>’);<a href=”http://www.burstnet.com/ads/ad23369a-map.cgi/ns/v=2.3S/sz=728x90A/” target=”_top”><br /><img src=”http://www.burstnet.com/cgi-bin/ads/ad23369a.cgi/ns/v=2.3S/sz=728x90A/” border=”0″ alt=”Click Here” /></a><br />

Read Full Post »

LATE Afternoon *BUMP* 
(by special request)
Original post: September 28, 2011
= = = = = = = = = = = = = 

This is such a clever idea! It never even occurred to me that you could print on post-it notes! I think this is proof that I am not thinking outside the box enough. 🙂   Must work on that!

Found this helpful tutorial and template at SugarDoodle.net

There are a lot more step-by-step instructions out there on the internet.  Just ask my friend Google.

Basically it boils down to this:
1 Download a template for typing up post-it notes. I suppose you could make your own (margins 2.5 in. wide & 2.7 in. high)…but why????
2 Type your message into each box. (Using copy and paste of course!)
3 Print the document as you normally would, apply a post-it note over each typed message.
4 With the post-it notes covering the typed messages, place paper into manual feeder of your printer. Print the page again.
5 Impress your friends, family, co-workers, students, etc with how clever you are!

ehow.com
WildOlive.blogspot.com

And here’s another fun twist to the idea at one of my favorite blogs:  Wild Olive

Print out her cute heart PDF template to use for leaving “love notes” for your kids, your sweetie, your boss (maybe not), or whoever! 🙂

Giverslog.com

Oh….and here’s ANOTHER idea from a great blog:  Giverslog.com

A sticky note ADVENT CALENDAR!    Sooooo clever!


Now go get printing
(bet you come up with something even MORE clever)!

Read Full Post »

Hello….my name is Jill…and I am a snacker. As in, I would much rather eat 8 to 10 small “meals” a day than 3 large ones.

I just feel better and work better this way. Don’t ask me why.

So with that in mind…you can see why this post about Triscuit Toppings is right up my alley.

try to look past the clutter….I do.

I have to chuckle at how it came about though.  Sometimes I find “inspiration” in the ODDEST places! Take today…I was sitting at my desk working (and snacking on cheese and crackers) when I happen to notice these rather delicious-looking morsels on the back of the Triscuit box. Sure beats what I’m eating! (Although the Boursin cheese spread with garlic and herbs is pretty delicious in its own right sittin on top of a Triscuit.)

Upon closer inspection I notice the website Triscuit.com is listed with directions to go there for recipes.  Oh I am on it!  What I find is a goldmine of tempting Triscuit snack creations! 

There is one SMALL problem with these “Triscuit SMALL Plates” however…it’s actually redirecting me to a website all about WINE PAIRINGS with the different types of Triscuits. (I think there are about 347 difference varieties now!)  Well, as some of you may know who have read my “About Me” page, I am very blessed to be 4+ years clean and sober and hanging out on a wine tasting site is just tempting fate. 🙂

So, I quickly download the free printable .pdf files and got the heck outta dodge! Whew! I came THIS CLOSE to falling off the wagon for your people! That’s how much I love all of you! lol.  Of course I’m teasing….but I would do almost anything for you guys (and gals)….almost. 😉

So….after all that….I present to you my favorite of the bunch!  I think there were probably 20-25 in all.

Don’t those sounds perfectly delicious??? I can’t wait to try some of these on my favorite Triscuit crackers. What are my favorite Triscuit flavors? Well, I’m glad you asked!  ðŸ˜‰

Here they are in order of preference:

That being said…I haven’t been able to find the Roasted Garlic in any store I’ve looked in for well over a month now!  I’m thinking I’m not the ONLY one who considers them their favorite.

Come on Triscuit! Ramp up production or something! I miss my crackers! 🙂

Here are the Tempting Triscuit Toppings Recipes:

Herby Blue Cheese and Pear on the Rosemary & Olive Oil Triscuit

• 4 ounces creamy blue cheese • 2 teaspoons milk (if necessary) • 24 Triscuit Rosemary
& Olive Oil • 24 whole almonds (about 1 ounce), toasted and coarsely chopped
• 1 large firm but ripe pear, cored, and sliced thinly into 24 slices
In a small bowl, stir the cheese with a wooden spoon until it is creamy and spreadable.
If necessary, add the milk, 1/2 teaspoon at a time, to thin the mixture. Spread about
1/4 teaspoon cheese onto each cracker, and top with a pear slice. Sprinkle with almonds,
and serve.

Creamy Smoked Salmon & Brie on the Rosemary & Olive Oil Triscuit
• 8 ounces double-crème Brie, cut into 24 slices • 3 ounces smoked salmon,
cut roughly into 24 pieces • 24 Triscuit Rosemary & Olive Oil • 2 tablespoons
crème fraîche • 1/4 cup capers, drained
Place one slice of Brie on each cracker, and follow with a piece of salmon. Spoon
on 1/2 teaspoon of crème fraîche, and top with a few capers. Serve immediately.

Apricot, Goat Cheese, Thyme, Honey, and Toasted Walnuts on the Original Triscuit

• 24 walnut halves (approximately 1 cup) • 24 Triscuit Originals • 4 ounces fresh goat cheese • 12 dried
apricots, finely chopped • 1 to 2 teaspoons milk (or more, as needed) • 3 1/2 tablespoons fresh thyme,
finely chopped (or use 1 tablespoon dried thyme) • 2 tablespoons honey
Preheat the oven to 350 ÌŠF. Place the walnuts on a baking sheet and bake until they smell nutty and the
skins are slightly darker in color, 6 to 8 minutes. Remove from oven and let cool. In a medium-size
bowl, mix the cheese, apricots, and 1 teaspoon milk. Stir with a wooden spoon until creamy.
If necessary, add more milk to make a spreadable consistency. To assemble: Place
about 1/4 teaspoon of the cheese mixture onto each cracker. Sprinkle with thyme,
and top with a walnut. Drizzle lightly with honey and serve.

Brie and Mango with Lime on the Original Triscuit
• 24 Triscuit Originals • 12 ounces Brie cheese, sliced into 24 pieces • 24 slices of fresh mango
or papaya (sliced mango is usually available in the refrigerated section of the produce
department; try to avoid fruit that’s packed in syrup) • 1/4 cup crème fraiche • 2 tablespoons
finely chopped lime zest
Place one slice of Brie on each cracker. Top with one slice mango (if the slices are large, cut
in half crosswise as well as lengthwise into 1/4-inch thick slices). Drizzle with the crème fraîche,
top with lime zest, and serve.

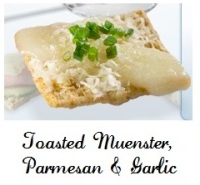
Toasted Muenster, Parmesan, and Garlic on the Original Triscuit
• 3 ounces Parmesan cheese, finely grated • 1 teaspoon garlic powder
• 8 ounces Muenster cheese, cut into 24 thin square-shaped slices • 24 Triscuit Originals
Preheat the oven to 400 ÌŠF. In a small bowl, mix the parmesan and garlic powder together. Place
the crackers on two large baking sheets. (If you don’t have two baking sheets, you can cook them
in batches). Distribute the Muenster onto each cracker and top with the parmesan-garlic mixture.
Bake until the cheeses are melted and golden in color. Serve right away.

Spicy Monterey Jack & Avocado on the Cracked Black Pepper & Olive Oil Triscuit

• 1 medium-size ripe avocado (about 8 ounces) • 24 Triscuit Cracked Pepper
& Olive Oil • 8 ounces Monterey Jack cheese, cut into 24 slices • 2 tablespoons
(1 ounce) mild to medium-hot salsa • 1/4 cup finely chopped cilantro leaves
(optional)
Peel the avocado and slice it lengthwise into 12 1/4-inch thick slices. Cut each
slice in half crosswise. Place one slice of cheese on each cracker. Top with 1/4
teaspoon salsa, followed by a slice of avocado. Sprinkle with cilantro, if using,
and serve.

Bubbly Four-Cheese Tomato on the Cracked Black Pepper & Olive Oil Triscuit
• 5 ounces mozzarella, coarsely grated • 5 ounces fontina, coarsely grated
• 2 ounces ricotta • 1 ounce Parmesan, finely grated • 12 cherry tomatoes,
halved lengthwise • 24 Triscuit Cracked Pepper and Olive Oil
Placing rack 6 inches below the heating element; preheat the broiler. In a medium bowl, mix the
cheeses. Place 1 teaspoon cheese blend on each cracker. Press one tomato half, cut side down,
into the cheese. Place the crackers on a baking sheet and broil 1 to 2 minutes or until the cheese
melts and the crackers are a shade darker on the edges. Let cool slightly, and serve.

Lemony Caprese on the Fire Roasted Tomato & Olive Oil

• 8 ounces fresh mozzarella (drained if water-packed), cut into 24 slices
• 2 medium tomatoes • 24 Triscuit Fire Roasted Tomato & Olive Oil
• 2 tablespoons lemon zest, finely chopped • 1/4 cup thinly sliced
fresh basil leaves
Cut four 1/4-inch-thick slices from the middle of each tomato, and cut each slice
into thirds. Place one piece of tomato and a piece of cheese on each cracker.
Top with basil, then sprinkle with lemon zest. Serve.

What access to all these yummy recipes on your phone???
There’s even an APP for that! 🙂  

Tantalizing Triscuit Toppings are today’s…..

Read Full Post »

…3 items that you should always have in your handbag.


My lips have been killing me lately!! I don’t usually get really badly chapped lips, even in winter, because I’m always putting lipstick on and reapplying it throughout the day. But for some reason this winter is different. I have been going through chapstick like water! I even bought a new tube of Burt’s Bee’s chapstick today and I don’t know if it’s going to help…but I do know it STUNG! Wasn’t expecting that. My poor lips. They need help!

So I was searching for chapped lip remedies online and ran across a video from the Dr. Oz show titled Healthy Handbag Essentials. It was all about the 3 items that you should always have in your handbag….including a “miracle lip healer”! SCORE!

According to Constance White, Style & Beauty Expert, the following 3 handbag items are easy and simple and can eliminate a lot of the junk we schlep around everyday.

#1 Green Tea Bags for Chapped Lips.

I keep at least 3 lip products in  my purse…lipstick, lip gloss and lip balm…but I know some people who have a separate bag inside their handbag that’s FULL of just lip stuff.  White says we can replace all our chapped lip products with a Green Tea Bag!  You just dip the tea bag in warm water, put it on your lips, and it helps severely dry or chapped lips. Apparently the polyphenols in the Green Tea Bag soothe inflamed tissue and help to heal your chapped lips.  Just rest the Green Tea Bag on your lips, suck on it and enjoy a cup of tea afterward!

#2 Mini Toothbrushes

I think everyone carries AT LEAST ONE breath product their purse. I personally always have at least one little round container of IceBreakers mints.(Wintergreen!) Some carry mouthwash, mints, gum, etc.  White suggests replacing all of it with Disposable Mini Toothbrushes, which cost around $5 for a pack of four and take up much less room in your handbag.  Each Mini Toothbrush has a little bead of toothpaste embedded into it and a toothpick on the other end so that you can freshen your breath and whiten your teeth any time and any where!

#3 Cocoa Butter Cream


I am guilty of this one too. Lotions! I have at least two bottles of lotion from hotel stays in my purse right now. Who knows what’s even IN those bottles! Oy!  White recommends keeping a small container of Cocoa Butter Cream in your purse instead and said it’s been used for centuries to moisturize skin. The cocoa extract helps to form a barrier between your skin and the environment. BONUS: Dab a little of the Cocoa Butter on your hair to tame frizzy hair and flyaways!

That’s it. That’s all you need! Just 3 things.  ðŸ™‚

Well, I personally would need at least a few more things. So here are MY additions:

Jillee’s Healthy Handbag Essentials:

* A bottle of essential oil blend (either Serenity or Balance by doTerra)

* Acetaminophen of some kind.  ONLY thing that helps my headaches.

* A small bag of almonds. Perfect pick-me-up when you are hungry and/or tired. I don’t leave home without them!

OK…THAT’S all you need.  Well, OK…that’s all *I* need.  I would love to hear what YOUR Healthy Handbag Essentials are!!

A healthy, happy handbag is today’s…..

UPDATE:

MORE Chapped Lip Remedies I found in my search for relief:

Run your toothbrush under some warm water, until the bristles soften. Then, ever-so-gently, brush your lips with the brush to remove any dead, dry or flaky chapped skin. Liberally apply a heavy moisture (petroleum jelly is kind of a great one, even though it sounds gross), and keep some with you to re-apply throughout the day. Be sure to drink plenty of water, and keep try to keep the lizard-like lip-licking to a minimum.

Cranberry Honey Lip Gloss! Mmmm…..sounds delicious!
from honey.com

1 Tablespoon sweet almond oil
10 fresh cranberries
1 teaspoon honey
1 drop vitamin E oil

Mix all the ingredients together in a microwave-safe bowl. Microwave for two minutes or until the mixture just begins to boil. (Bowl may also be heated in a pan of water on a stovetop). Stir well and gently crush the berries. Cool mixture for five minutes and then strain through a fine sieve to remove all the fruit pieces. Stir again and set aside to cool completely. When cool, transfer into a small portable plastic container or tin. Apply to lips and remember to DRINK PLENTY OF WATER!

Read Full Post »

As usual, when I post another crazy cleaning tip I have to wonder how many people will think I’ve completely lost my mind! 🙂  Well, if you haven’t thought that before….this post may just convince you otherwise.

But here goes….because CRAZY or not…it works! 🙂

So here’s a question for you…..take a look at this picture. Does this look like a floor that has JUST been swept and mopped? Of course not! Look at all the dirt that is still “polka-dotting” the floor!

Well, believe it or not…this picture WAS taken right AFTER I had swept and mopped! That dirt you see is dirt that is SO imbedded into the indentations and crevices of the design that it is IMPOSSIBLE to get out. I have tried everything! Well, everything short of setting it on fire! 🙂  THAT would probably take care of the problem!

I had long ago given up on ever getting that ground in dirt out. I just sweep and mop regularly (while daydreaming of my future hardwood floors) and TRY not to notice it too much.  Well that is IMPOSSIBLE as well.  It just drives me crazy!

If you have been reading my blog for awhile…you might remember this post from last month:

Homemade Carpet Stain Remover…NO Scrubbing Needed!

If you HAVEN’T read it before….QUICK….click on over there!  There is some GOOD info! 🙂

I was so impressed by this technique…that it got me thinking about my kitchen floor. This couldn’t possibly work on vinyl flooring! Could it??????? hmmmmm. I couldn’t think of a good enough reason NOT to try it. (Except for the embarrassment of being caught sitting on the floor “ironing” my kitchen floor!)

So I did. And well, once again, the pictures speak for themselves!

Yes, believe it or not, I spent probably an hour or so IRONING MY FLOOR!  If that doesn’t scream NUT JOB….I don’t know what does. lol.  But despite the hubster and kids shaking their heads at “crazy mom” doin her “thing” again….it was *I* who had the LAST LAUGH! hahahahaha. I finally conquered the the IMPOSSIBLE dirt imbedded into my kitchen floors!

The pictures below kind of tell the tale of how I did it.  But I basically did exactly what I did in the previous post about getting stains out of carpet…although I soaked a towel in the ammonia mixture before I put it down on the dirty area. I didn’t bother with spraying.  Just make sure the towel is nice and wet. Then put your iron down on the towel and let the power of the ammonia and HOT steam do its MAGIC!

Try and keep the iron ON the towel and not on the vinyl. 🙂
I had the iron set on its highest heat setting and ironing on top of just
one thickness of towel.  No burns, discoloration, nothing. Just clean!

This picture shows how the “dots” of ground in dirt are actually
stuck to the towel after going over it with the iron! (Kind of looks like pepper.)
At this point you can see there is still ground in dirt in the flooring…but the ammonia
mixture and the steam from the iron have softened it so much that all I
had to do was rub the rest of the dirt off with the rag.

I worked in sections as I went from left to right in front of both my
sink and my main island countertop area…the worst areas of the kitchen!

Here’s what it looked like as I made progress.
Left hand side, done…right hand side, not done.

A little more progress. It’s hard to believe the difference!

I’m not exactly sure how many people suffer from this ground in dirt dilemma…but I’m pretty sure I’m not the only one. If you have this problem and have given up (like I did)…I HIGHLY RECOMMEND trying this! Just be prepared for the incredulous looks and confused stares of those in your household who see you sitting in the middle of the kitchen floor with your steam iron! 😉

Getting the gunk out of IMPOSSIBLE to clean floors is today’s…..

Read Full Post »

A couple of weeks ago…for no apparent reason…my husband started doing the oddest thing. Every night (OK, early morning), when I would finally stumble down the hallway to my bedroom after working on my website, etc…I would go to climb into bed and my side of the bed would be perfectly turned down...just like at a fancy hotel. My white sheets gleaming in the pale moonlight, inviting me to rest my weary bones for awhile.

I have to say, when you are practically delirious from lack of sleep (much like I feel as I type this)…just the simple act of trying to find where the covers are on your bed in the dark can be a monumental and somewhat frustrating task. This seemingly “little” gesture has really been appreciated more than I think the hubster will ever know.

I really do firmly believe that it’s “the little things” in life and in relationships that add up to mean the most in the long run. I believe that the most successful marriages, partnerships, friendships, etc must have this idea figured out.

But in this crazy, busy life we live in, it’s so easy to forget “the little things” that eventually make up the “BIG THINGS”….like a long, happy and successful relationship.

So, since Valentine’s Day is just a few weeks away….why don’t we get a jump on things, and start showing our loved ones how much we care now…so that when they get that heart-shaped box of chocolates and card from the grocery store…they will know those are just the “tokens” of our affection. They will know by the “little things” that they are loved always and not just on February 14th.

OK…I’ll start out….but then I really would love it if you would chime in with a “little thing” or two of your own.

**** Have your sweetie’s favorite snacks on hand. 
In the case of our house…if there is always vanilla ice cream in the freezer and spanish peanuts and chocolate syrup in the pantry…the hubster (with a sweet tooth the size of Mount Rushmore) is a happy camper.

**** Try to honor Pet Peeves whenever possible. 

**** Wash their car and put gas in it…for no apparent reason.
I know this from personal experience. It’s one of my favorite “little things” the hubster does for me!

**** For guys:  Watch a “chick flick”. For girls: Watch a “shoot ’em up” movie…without complaint.

**** Grab his or her hand and hold it whenever possible.

**** Very first thing when your or your sweetie get home from work, seek out the other person and give them a kiss and a hug! VERY FIRST THING.  

My Dad always did this with my Mom and I will never forget it. Not only does this serve to strengthen you and your sweethearts relationship…it’s giving the next generation an example to live up to.

OK…..now it’s your turn!!  (I’ll keep adding as I think of more).

Remembering to do “The Little Things” for our the one’s we love is today’s…..

Read Full Post »

Yes, believe it or not, I once was one of those crazy ladies you see on “Extreme Couponing”.  


Well OK, that’s not entirely true. I like to THINK I was the Queen….but in reality I was more like a Princess…or maybe a maidservant to a Princess. But either way, *I* thought I was pretty good at it.
I even have pictures to prove it!

See???

These are some hauls from Walgreens and Albertson’s from a few years back. I don’t remember particulars but let’s just say there were SERIOUS savings involved!

I’m still a big believer in the money you can save with coupons! There just came a time when I simply didn’t have time to do it anymore. (hmmm…that’s about the same time I started this blog. Go figure!)
Any serious couponer will tell you….it takes a lot of time to work the deals! There’s the clipping of coupons and organizing of coupons and then studying the deals and deciding which ones to go for and which ones to pass on….and that’s just the tip of the couponing iceberg!
Not to mention all the running around to different stores to get the best deal at each.

I don’t want this to come off as a coupon-bashing post at all….because it’s not! If you are SERIOUS about cutting your food budget…you definitely can save a LOT of money! But like most things in life…there are trade offs.

Even though I don’t do the extreme couponing anymore…there are some things I learned from the experience that I continue to do that really help trim the grocery budget and don’t take a lot of time.

You hear the word “stockpiling” alot when it comes to couponing. Some people have developed some SERIOUS stockpiles through couponing. Here are just a couple I found online.

CRAZY, HUH????

Benefits of stockpiling: you can basically “shop” at your own “store” for free! You are well-prepared for emergencies. (job loss, food shortages, etc.)


Drawback: you need a lot of SPACE to STORE all that stuff!

So, no, I don’t have a stockpile anywhere near the size of these….but I have started 
my own mini-version of “stockpiling” 
and it goes like this:

Step One: 
Find a website that matches up store sales with available coupons.

There are lots out there. I happen to use GrocerySmarts.com, but there are others like CouponMom.com; TheGroceryGame.com; TheKrazyCouponLady.com, etc.

Every week they will post a list with the sales available at your store (or whatever store you choose) and the coupons that are “out there” that match up with the deals. This is INVALUABLE!  It would be almost impossible to keep track of this stuff on your own.

GrocerySmarts.com even has a rating system (1 to 5 stars) to show what are the REALLY hot deals. 5 stars means….TIME TO STOCK UP!

So, a quick scan down the list and I find one of our personal favorites on sale….Crest Pro Health Toothpaste! Ever since I brought this home the first time…hubster won’t use anything else. Such a toothpaste snob. 😉

Anyway, that toothpaste ain’t cheap! UNLESS it’s on sale AND you have a COUPON as well.

Step Two: 
Since I don’t personally clip coupons anymore….I head on over to ebay.com to find the people who DO! 


After a quick search for “Crest coupons” and I find this coupon clipper selling 20 – $.75 off 1 Crest toothpaste 4.0 oz or larger coupons for $1.25!

The trick here is to check the ad the FIRST DAY IT COMES OUT so you will have time to receive the coupons in the mail before the ad ends!  Not a big deal though. These coupon “sellers” are very aware that these deals are TIME SENSITIVE and will send them out promptly. At least that’s my experience. And if the store happens to “run out” of something while you wait for your coupons to arrive in the mail….you can always get a “raincheck”.

Warning:  I am about to attempt to do math…nobody distract me!
This could be dangerous!

  • Regular price of Crest Pro Health Toothpaste (according to ad) $2.69 ea.
  • Sale price $1.69 ea (when you buy 4 or more)
  • Minus your $.75 cent coupon = $ .94 cents each!

    Now…you paid $1.25 for the coupons so you have to take that into account, but if you use all 20 coupons…that’s a savings of $15.00! 

So you could conceivably get 20 tubes of Crest Pro Health toothpaste for $20.05 (if you add back in the cost of the coupons)….a savings of $33.75! AND…you won’t have to buy toothpaste for a very long time. 
And THAT my friends is STOCKPILING

A quick and easy way to use coupons and SAVE BIG is today’s…..

Read Full Post »

Giving this post a “bump” up in my blog because I used this method again yesterday to clean my burner pans (which thankfully weren’t as nasty as the FIRST time because this time I actually knew how to clean them once they STARTED getting nasty!)

Once again I was AMAZED at how WELL IT WORKS and at how EASY IT IS!

For those of you who haven’t tried it….you simply MUST. Period. One of the best tips I’ve ever found on Pinterest…and that’s saying a LOT!

This time along with the burner pans I put the actually BURNERS in too. (Yes, my stove is an electric dinosaur.) No surprise….they came out GREAT!

(Original post: August 8, 2011)


I have 3 words for you today:   BEFORE and AFTER

These were my stove burner pans on Saturday. I know…..NASTY! What can I say? I cook…a LOT! Can you can tell which burner I use the most???

This shows each burner pan sealed in a ziploc bag with just a splash of ammonia poured into each.

The same burner pans…less than 24 hours later!
The pictures speak for themselves….

BEFORE AND AFTER

I read this blog post over at The V Spot on Friday….decided to try this cleaning “trick” on Saturday, and you can see the results from Sunday!  Less than 24 hours later with NO SCRUBBING INVOLVED, the cleanest my stove top and burner pans have EVER been! The ONLY thing I did in addition to what Vivienne at The V Spot did was used a little paste of baking soda and hydrogen peroxide to rub off some last little bits of gunk that needed the tiniest bit of elbow grease to get off. As a matter of fact, I think the baking soda/peroxide paste actually “polished” them a little and restored some of their original shine.

I was HIGHLY SKEPTICAL of this….but figured I’d tried everything else under the sun to get these things clean with no success…might as well give this one a whirl.  SO glad I did!  Now it’s YOUR TURN….I dare you to prove me wrong! 🙂

And that’s today’s….

Read Full Post »

Older Posts »